
The complete guide to building great designs with Claude Design
Define once, design repeatedly and fast: a reproducible workflow
Every time you open an AI design tool, you describe what you want from scratch. The vibe you're going for, the idea in your head. And every time, the result comes out slightly off: a blue that isn't quite your blue, typography that looks like every other design you've seen lately, a heading that isn't quite the one you imagined. The tool isn't the problem. The problem is that your design lives in your head, where the tool can't reach it.
I started out as a product designer, back when UI and UX weren’t even separate jobs yet (yes, that long ago). I spent years pushing pixels around in Adobe Photoshop before moving on. Later, no longer working as a designer, I picked up Sketch, Figma, and even Canva.
But that was a long time ago, and I’ve worked as a product manager for years since. So here’s the disclaimer: this is for people who want to ship better design before bringing in a designer. It’s not meant to replace a designer’s workflow. If anything, my years as a product manager taught me the opposite: a good designer is exactly what you need to truly level up your design and user experience.
Starting out and setting a foundation on your own just got a lot easier. Claude Design launched back in April, and it has quietly become the only design tool I use.
Claude Design doesn't replace designers, and doesn't replace design thinking. I want to show you how I use it to move fast from idea to a decent-looking design, whether you're just getting started, building out a new feature, or want to sketch something out quickly. What it does replace is staring at a blank page hoping for ideas, and the busywork that slows you down.
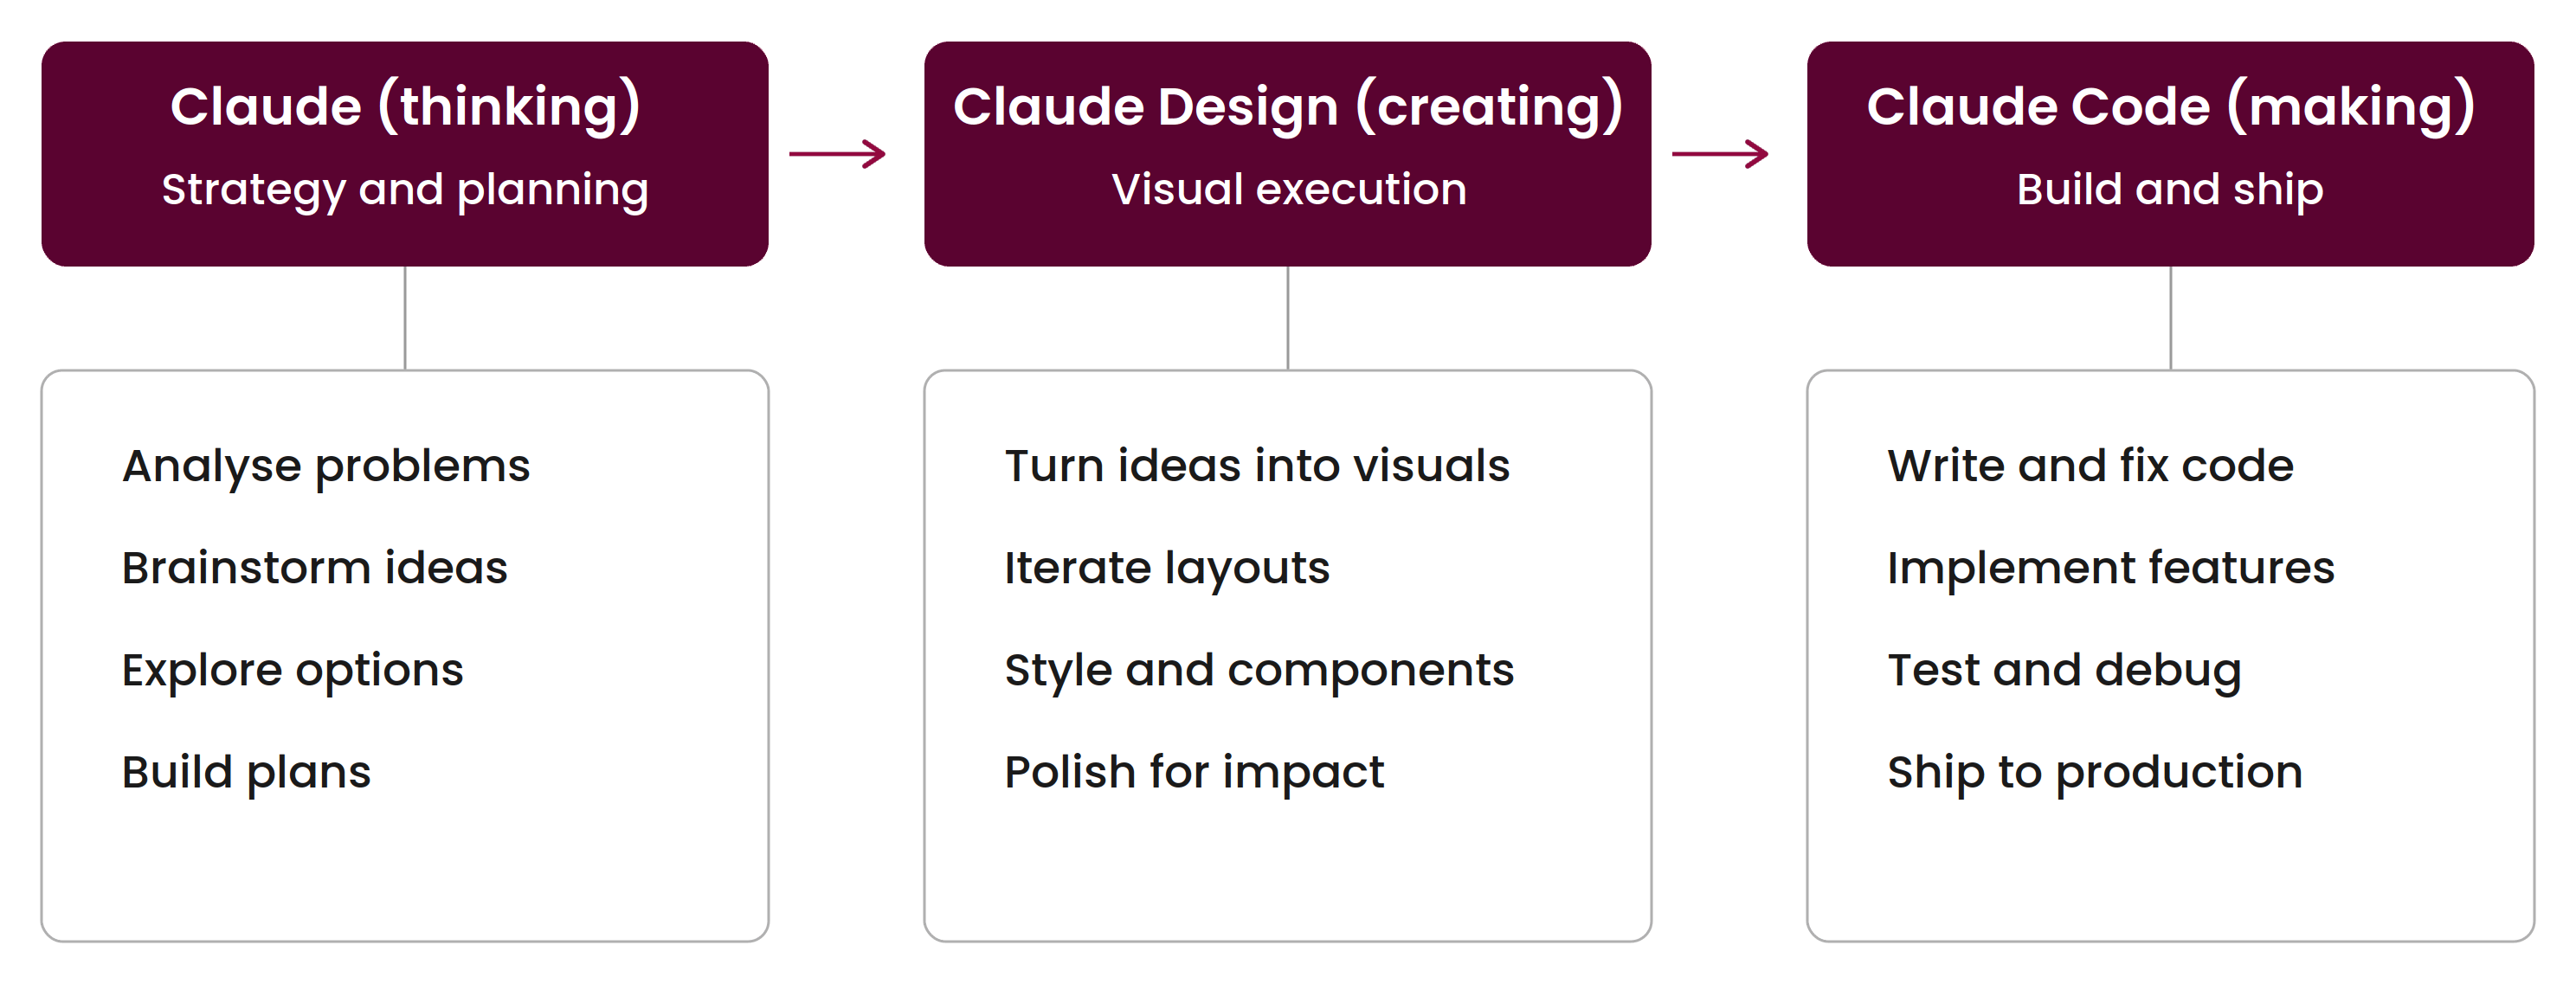
And it all runs on one system, with three tools:

Advanced prompting for creative work
If you've read this far, chances are you already know the feeling: the results don't always turn out the way you pictured. So what’s going wrong? Well… the language. You and the model don’t speak the same one yet.
When you say “make it modern,” Claude has to guess. Modern could mean brutalist, minimalist, glassmorphism, or the flat gradient look every site seems to have these days. When you say “nice styling,” there are a hundred kinds of nice. The model isn’t failing you. It’s filling the gaps you left open with the statistical average of everything it has ever seen, and that average is exactly what “generic” is.
The answer isn’t that you have to learn to talk like a machine. You don't need to memorize every design movement in history and a semester of color theory to get good output. The answer is to let Claude do the translating. With the right techniques, you describe what you want the way you naturally would, conversationally, in your own words, and Claude turns that intuitive brief into the precise, technical language the model can act on.
That’s the real skill. Not speaking AI’s language, but knowing how to make Claude bridge the gap for you.
1. Structure the design brief
Most people write one line and hope. “A clean landing page for a productivity app.” Claude fills every gap you left open, and you already know what it fills them with.
A strong visual brief has five parts:
Subject: what you’re actually making, specifically
Context: where it lives, the environment around it
Style or medium: photography, illustration, flat UI, editorial.
Aesthetics and mood: the lighting, the palette, the feeling
Composition: framing, hierarchy, aspect ratio, the technical constraints
You don’t need all five every time. But when the output misses, the miss is almost always one you left blank. And be specific: 'modern' means nothing if you can't say what it looks like. Not sure yet? Brainstorm it with Claude first.
2. Give it a role
This one changed how I work. You’re not just describing what you want, you’re deciding who answers.
Ask Claude as a generalist and you get a polite overview: five options, plenty of hedging, no opinion. Give it a specific role, a senior brand strategist, an art director, the actual target customer, and you get one clear direction, a point of view, and sometimes pushback on your own brief. Same model, completely different thinking, because the role decides what it pays attention to.
A role is more than a job title. Build it in layers: who they are (concretely, not “a designer” but a named studio with a reputation), how they see the world, how they talk, and what they never do. That last layer matters more than you’d expect: constraints shape the output harder than descriptions do.
3. Make it show its work
Ask “what color should this button be?” and you get “blue.” Useless, because there’s no reasoning behind it and you’ll get something different next time.
Instead, ask Claude to show its thinking. Now “blue” comes with a why: contrast against the background, trust, alignment with your brand, passes WCAG AA. And once you can see the reasoning, you can argue with it. “What if we put accessibility above brand alignment?” You’re iterating on the decision, not just the pixels.
The bigger move is to stop writing prompts one at a time and hand Claude your design principles up front. Accessibility first. Minimal cognitive load. Mobile first. Now it applies those to every decision without you repeating yourself.

Four phases, one repeatable system
Most people open Claude Design and just ask for a design. But like I said at the start: Claude Design doesn't replace design thinking. Design thinking has two sides: are you designing the right thing, and are you designing it right. They sound similar, but they're different jobs. The first decides what deserves to exist. The second makes it good and usable.
Designing the right things
This comes before everything else. Deciding what to build, for whom, and why now: that's product work, and no tool fixes a design that solves the wrong problem. It deserves its own piece, so I'll write about it soon.
Designing the things right
This system is about designing things right, by running every design through the same four phases: Define, Ideate, Create, Handoff. It’s rooted in design thinking and the double diamond, adapted from real world design methods.
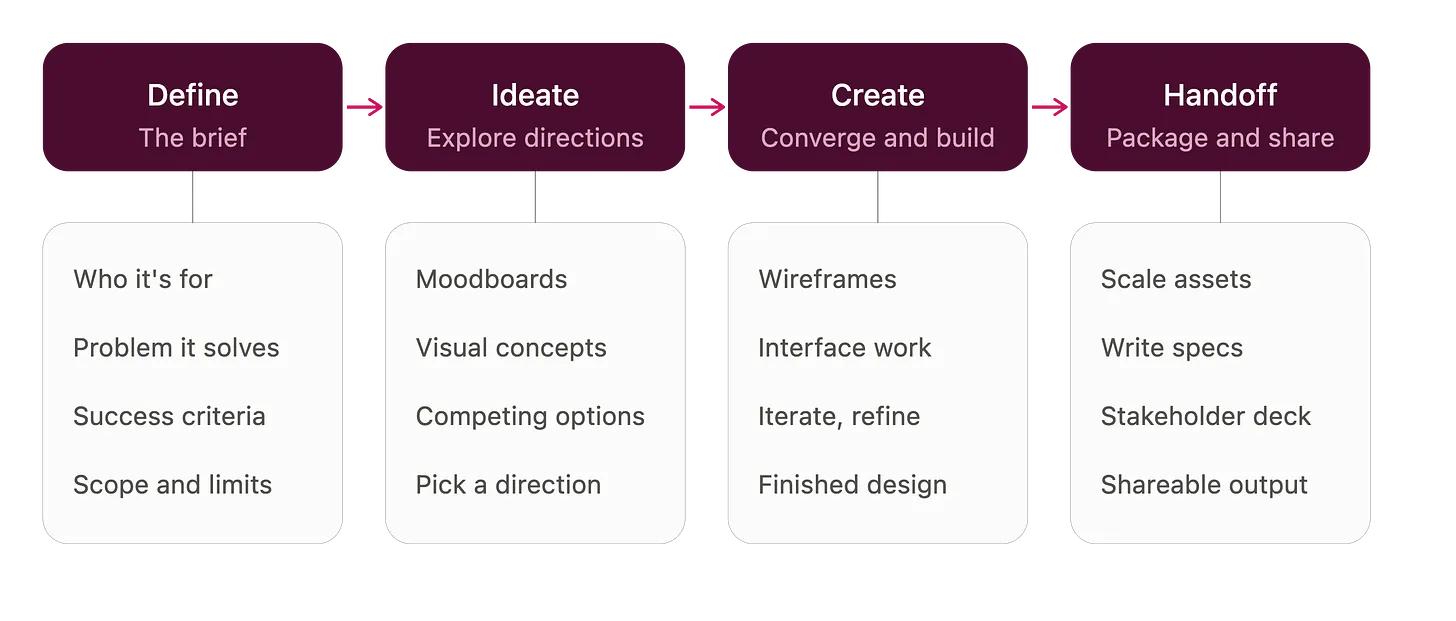
Define is where you turn a rough request into a brief. Start with your users: what are they trying to achieve, what are their problems, and when is this design successful for them? Then the boundaries: what’s in scope, what’s explicitly not? Add known references if you have them. By the end, Claude knows exactly what you’re trying to create and why.
Ideate on visual direction. This is the step most people skip, but it’s exactly where the insights come from. Explore broad and put multiple concepts on the table before you choose: moodboards, visual concepts, competing directions. Output is one chosen visual direction.
Create the design. This is the actual design work: building wireframes and high-fidelity designs, the real UI and interface work, iterating until it holds up. Output is a finished design (or sometimes directly into Claude Code to start building).
Hand off the design (optional). Export the design so someone can run with it: a developer, a friend, or you in the build phase. Standardize your assets, write the specs, or turn it into a deck for stakeholders. Claude Design makes it easy: a simple share button.
The design system is the shortcut
Creating a design system allows Claude Design to produce outputs that fit your specifications. It extracts reusable components, colors, typography, and patterns from the assets you provide and uses them as the foundation for everything you generate.
Design Fundamentals
The techniques and phases so far make the output better. But you don’t want to re-explain yourself in every prompt, and hope the result matches last time. You want speed, and results you can guarantee. That comes down to one thing.
Consistency, consistency, consistency. I cannot stress this enough. Great design is built on consistency: the same action gets the same word, the same spacing, the same color, everywhere.
So how do you force consistency? You lock it down. Not in your memory or your good intentions, but in a design system and guidelines. And it all comes down to tokens.
Brand Identity and Guidelines
Your brand identity is everything that makes your product recognizable and consistent (did I already mention that?): how you want to be perceived, your values, your tone of voice, and the visual choices that express them.
Brand consistency shows up across five areas:
Brand messaging: a clear, compelling mission and core values.
Visual identity: consistent logos, colors, and design elements.
Tone of voice: a unified communication style and personality.
Website design: a user friendly, responsive online presence.
Social media presence: engaging and cohesive activity across platforms.
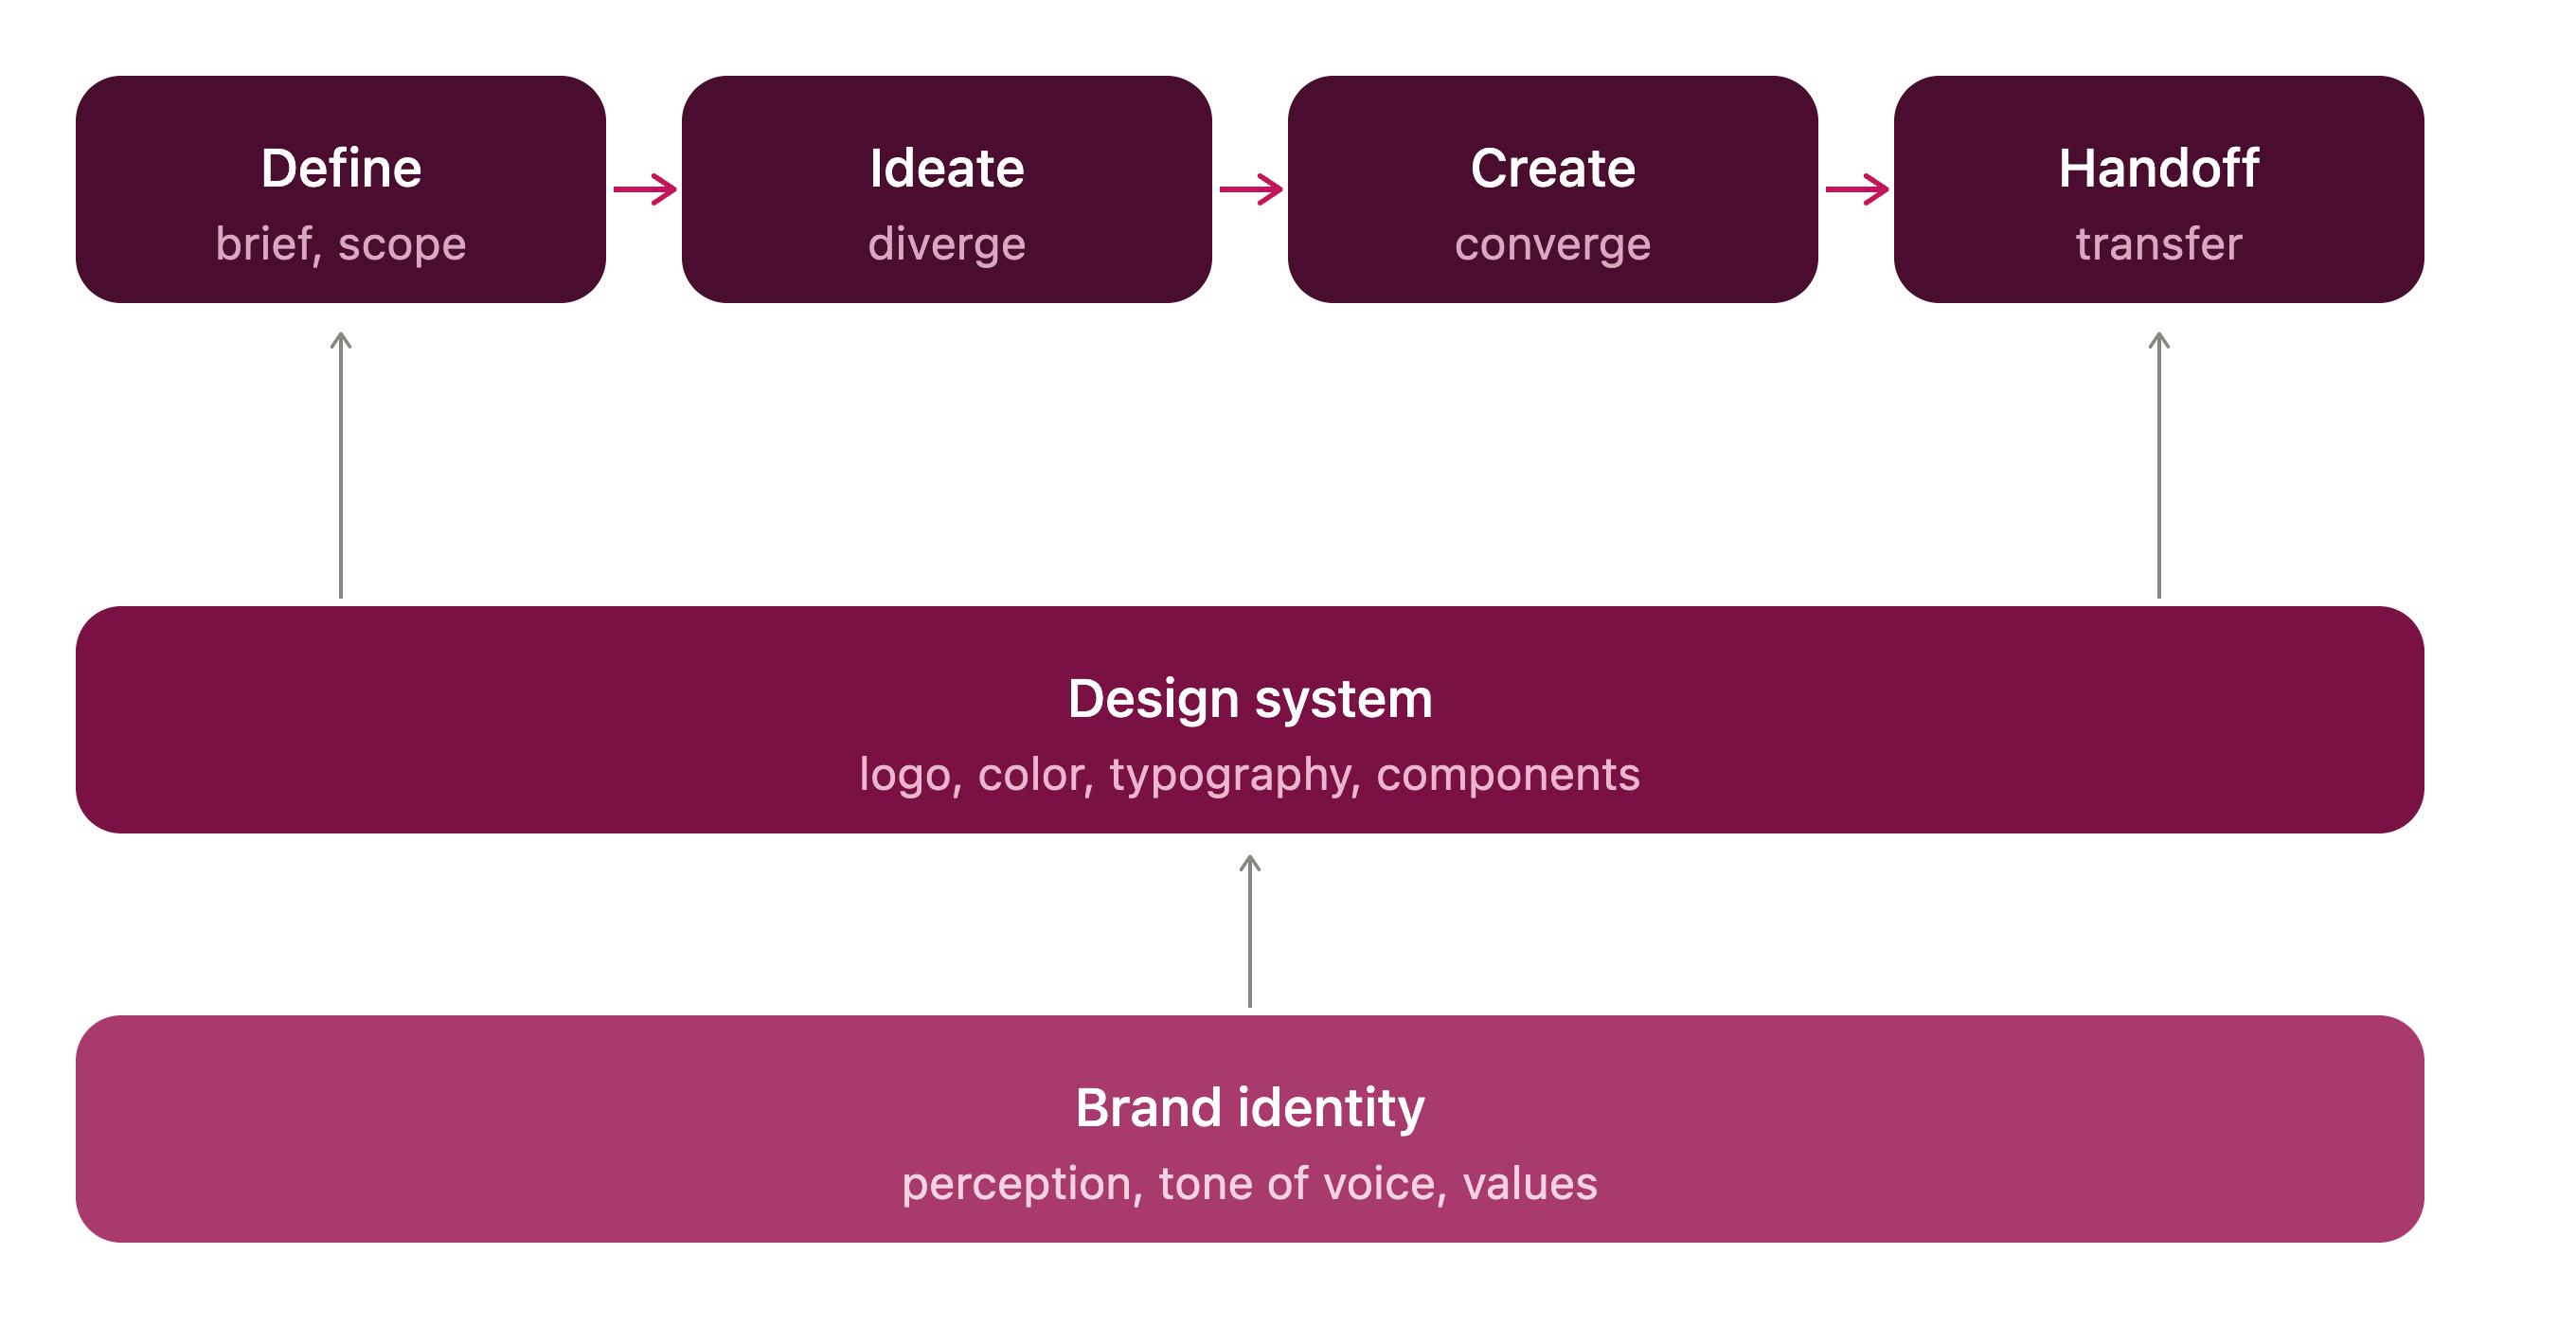
Brand guidelines are the strategic layer: your values, your tone of voice, the words you ban, your logo and its rules, what your colors and typography should express. The design system is the operational layer: it translates those choices into tokens, a type scale, spacing values, and components your product is actually built from. Strategy in the guidelines, execution in the system.
A simple markdown file will do: a BRANDGUIDELINES.md in your repo or workspace. Humans can read it, tools can read it, version control comes for free. And it happens to be exactly the source material Claude Design asks for when you set up your design system.
The operational layer needs a file of its own. Its building block is the token: a named design decision. Define it once, reference it everywhere, and everything follows when you change it. Tokens do not belong in your brand guidelines, because the two change on a different rhythm: guidelines shift with strategy, tokens with every build. So they get a DESIGN.md, holding your tokens, type scale, and spacing values, right next to your brand guidelines. Two files, two layers, both ready to feed into Claude Design.
Note: BRANDGUIDELINES.md and DESIGN.md are my own convention. Anthropic does not prescribe this setup, but Claude Design works well with it.
Design Systems in Claude Design
This is where everything comes together. The design system is what Claude Design actually works from: it extracts your components, colors, typography, and patterns, and applies them to everything you generate. Set it up once, and you stop describing your brand in every prompt.
One note beforehand
I follow Anthropic’s official documentation and build on that, rather than adding customized setups on top. This matters to me because of the large number of wild AI implementations out there, which are usually more complicated than intended and not how the tool is meant to be used.
That said, Anthropic hasn’t really defined a way of working with design systems in Claude Design yet. They don’t recommend a specific file or format. The only things they do support are the prerequisites and their built-in way of exporting. So that’s what I worked from.
The prerequisite for setting up a design system is at least one of the following as source material, according to Anthropic:
A codebase with your design system or component library
A slide deck or document that reflects your visual identity
Brand guideline assets (logos, color palettes, typography specs)
This means you need to have something in place already before you can create a design system. That is exactly where brandguidelines.md and design.md come in: they fall under the third category, brand guideline assets. Feed them in as source material, and Claude Design extracts your tokens and patterns from files you control and version, instead of from a slide deck it has to interpret.
Setting up an existing design system in Claude Design
If you already have something in place, that’s great: just import it. You’ll find it at claude.ai/design: go to design systems and click ‘create new’. Bring everything: your brand guidelines, existing designs, your repos, and don’t forget to upload your fonts. The more source material Claude Design gets, the closer the system lands to what you actually use.
A few things to look out for:
Large codebases: consider linking very large repositories from Claude Code to avoid lag or browser issues. To sync a design system, use
/design-syncfrom Claude Code.Design system import: the import is only as good as its source. A messy codebase or an incomplete file will show up in the output.
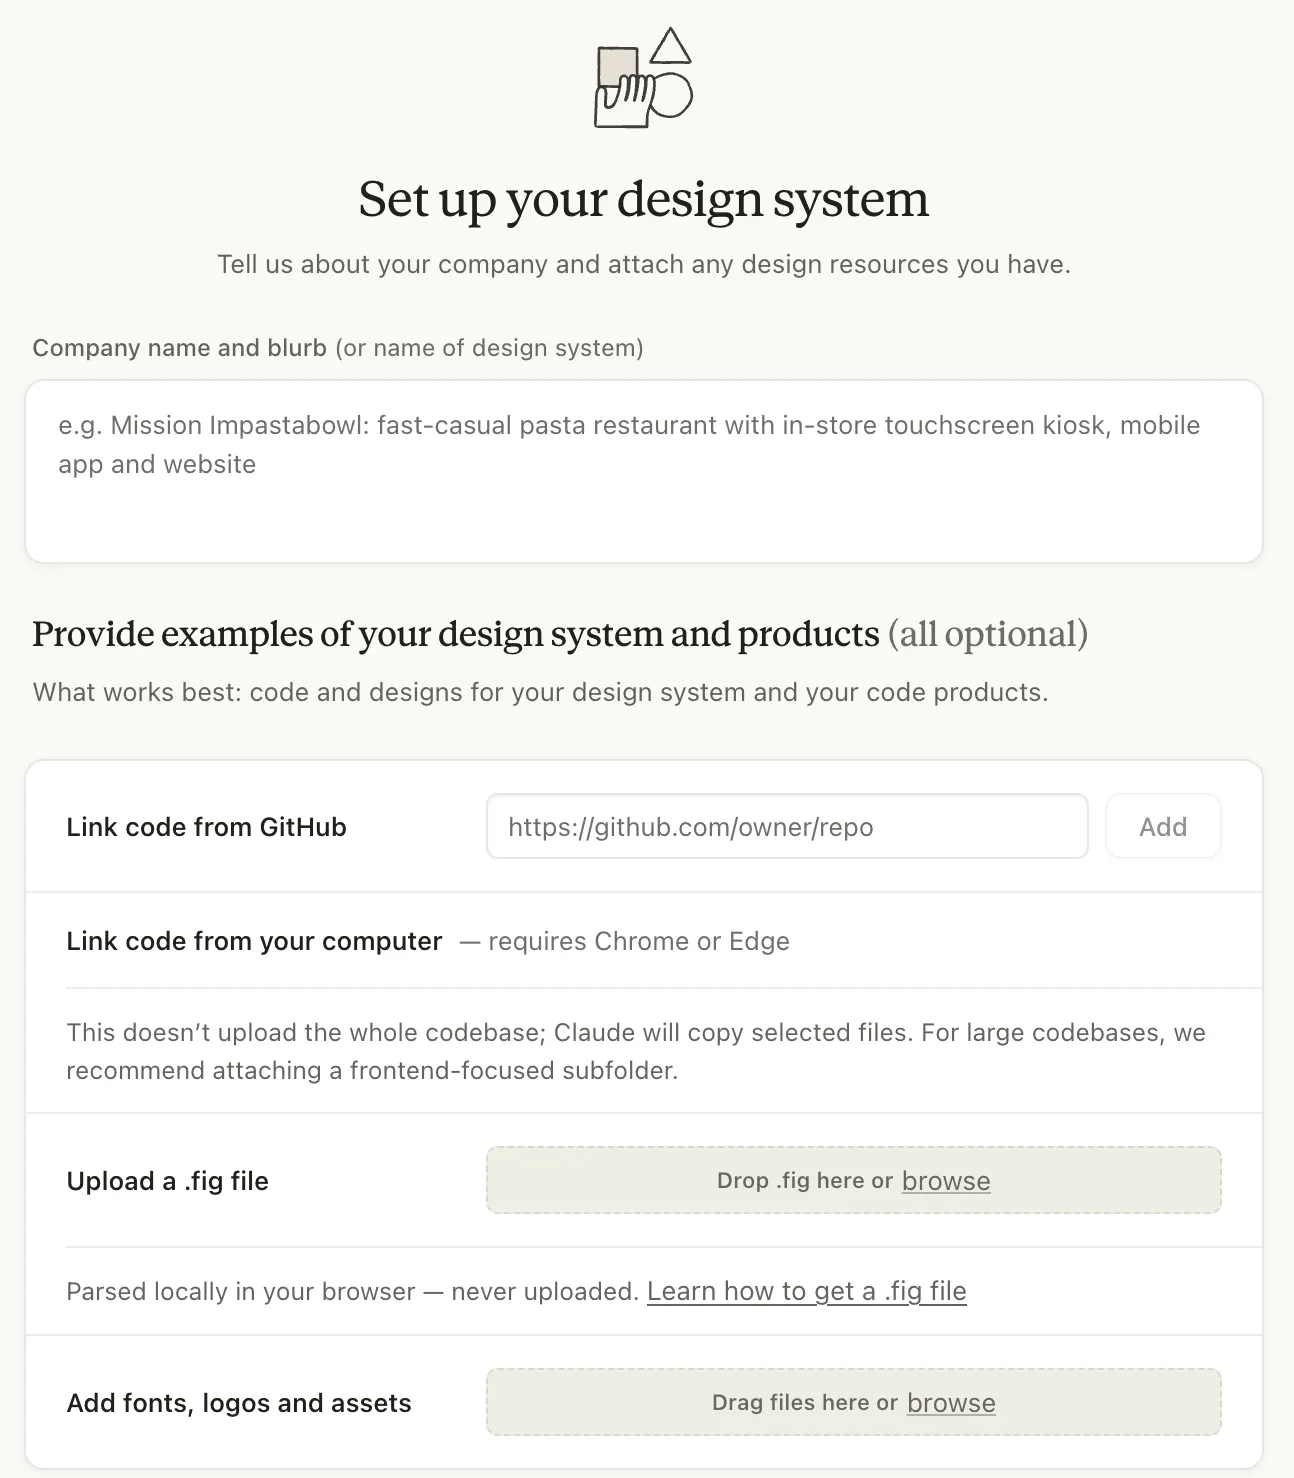
Setting up a new design system
Starting from scratch? No brand, no guidelines, nothing? Then we build one together, from first brainstorm to imported design system. I wrote a full step-by-step tutorial, using my own product as the example:
Full step-by-step tutorial, using my own product as the example, coming tomorrow on https://devmore.co/p/setting-up-a-design-system-from-scratch

To speed things up for your setup
To speed things up, I documented all of the above as skills. The design skills themselves live in a public GitHub repo, you can find it here: esmeepeters/design-skills. Every skill is copy-paste ready, install the plugin for the phase you need and Claude picks it up automatically.
The full workflow, how the phases connect and when to use which command, is written out in my Grimoire, find it here: grimoire.esmeepeters.com. The repo gives you the tools; the Grimoire gives you the reasoning behind how I use them.

One last important note
AI-generated output alone isn't copyrightable, anyone can use, adapt, or sell it. Add substantial human creativity, and it becomes a protectable hybrid work. Licensing has three layers to watch: training data, still unresolved legally, your AI tool's license, which determines what you're allowed to do with the output, and what you can pass on to a client, never more than your own license permits.
And AI output isn't automatically original, models sometimes reproduce training data, so check before you ship.
Conclusion: don't be lazy and just ask for a design. Write the brief, set up your foundations, run the phases, and tweak a little. Come on, you can make it pretty, even if you're not a designer.